1988 Samurai Build in Utah, USA

Got an vehicle build underway? post up pictures and tell us all how its going!

Builds threads only please.
UT410
Got muddy boots
Got muddy boots
Posts: 25
Joined: Tue Jan 28, 2014 9:51 pm
Location: Salt Lake City, Utah USA
Contact:

Re: 1988 Samurai Build: From "toad" to "off road"

Post by UT410 » Thu Jan 30, 2014 11:54 pm

I've been getting the axle housing ready for the suspension change and axle swap.

First I trimmed off the stock bracketry.

Image

...and brought the housing to be sandblasted. A job I absolutely hate. After doing it on some old car projects I have sworn it off. It's a tough job.

Image

When they came back all cleaned up. I brought them to a shop that has all the right equipment to keep the housings true so they don't warp while being welded.

A few hours later, the shop owner sent me this pic:

Image

He quoted me a couple business days and had it done in hours. He said once he got into it he was having so much fun he decided to stay late.

Image

There's still some work to be done to them. I want to fill up that hole by the driver's side perch in the front so nothing makes a home in the truss. As well, I need to put a anti wrap bracket on the rear housing. The spring plate on the driver's side will get a panhard mount, too.
For more of my build, check out my Instagram account: https://www.instagram.com/kungfubowler/

UT410
Got muddy boots
Got muddy boots
Posts: 25
Joined: Tue Jan 28, 2014 9:51 pm
Location: Salt Lake City, Utah USA
Contact:

Re: 1988 Samurai Build: From "toad" to "off road"

Post by UT410 » Fri Jan 31, 2014 12:08 am

Sometimes I come up with ideas that leave me sitting at my desk (or the kitchen table or behind the wheel or on the toilet) day dreaming about how I could pull it off. The last week, or so, I've worked on one of those type of ideas.

I want to keep my rear side marker lights. My new rear bumper doesn't have provisions for them. I could drill and mount them, easily. But there's no fun in that. Plus, I don't want it to look like that's all I did. I want it to look like Suzuki planned it from the factory.

This is what I came up with:

Image

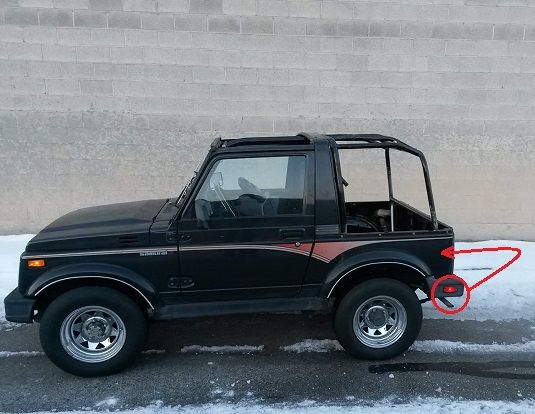
I figured it would be neat to take the lights from the bumper and put them on the rear quarter. There's only so much space on the passnger's side, but I think I could make it work. So, I put the word out to get me a part of a front fender. A gentleman on Zukikrawlers had what I needed and sent me off the piece.

Image

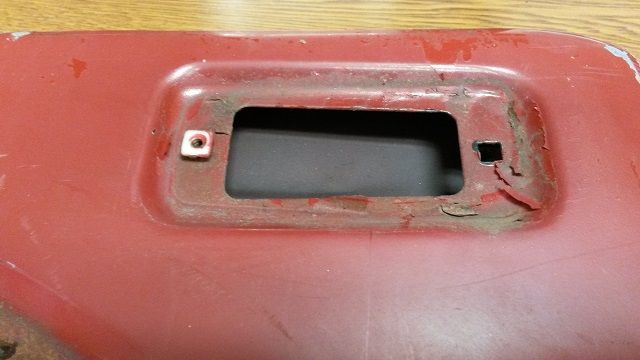
Cutting and welding was out of the picture. The body is in excellent shape and the paint finish will come back to life with some work.

So, I took the piece he sent me and made some measurements.

Image

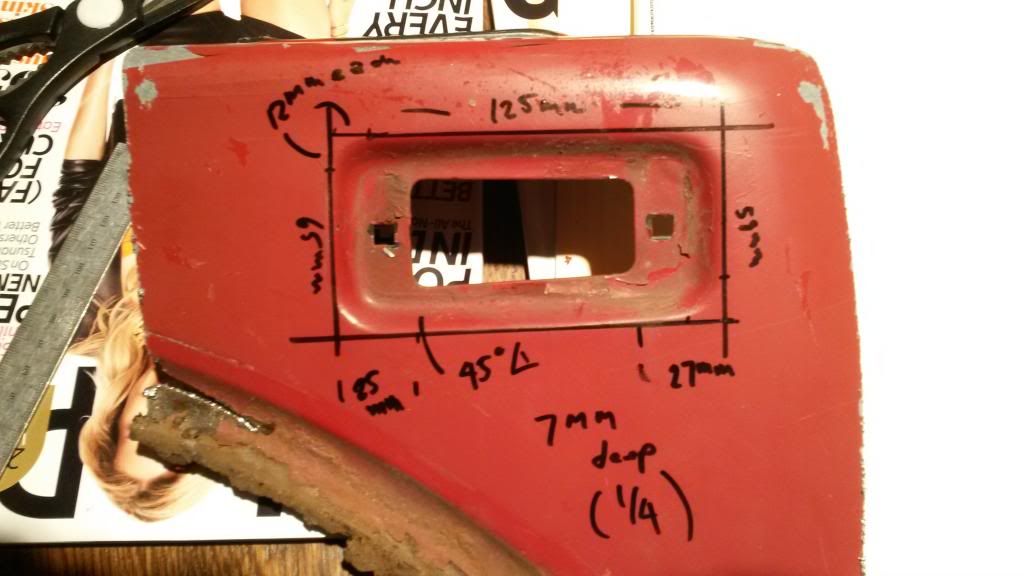
Metric is the best way to get precise, in my opinion.

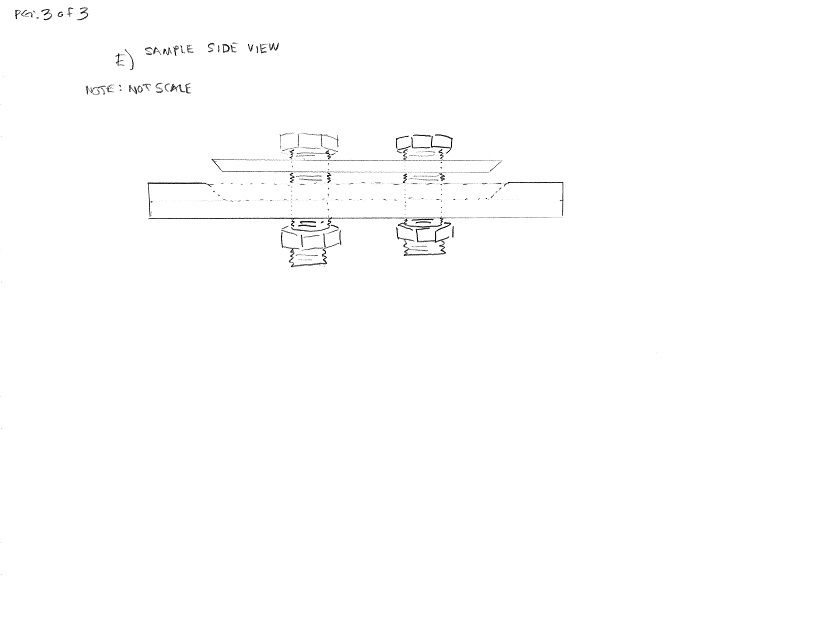
Then, I came up with a plan to make a male and female die that I can use on the vehicle. I did some research and asked a bunch of questions and there are plenty of folks that have done similar tasks on the vehicle. I will use an impact gun and grade 8 hardware. My gun should provide enough torque to get the male dies set. Well, that's the plan... hahaha.

Image

Image

Image

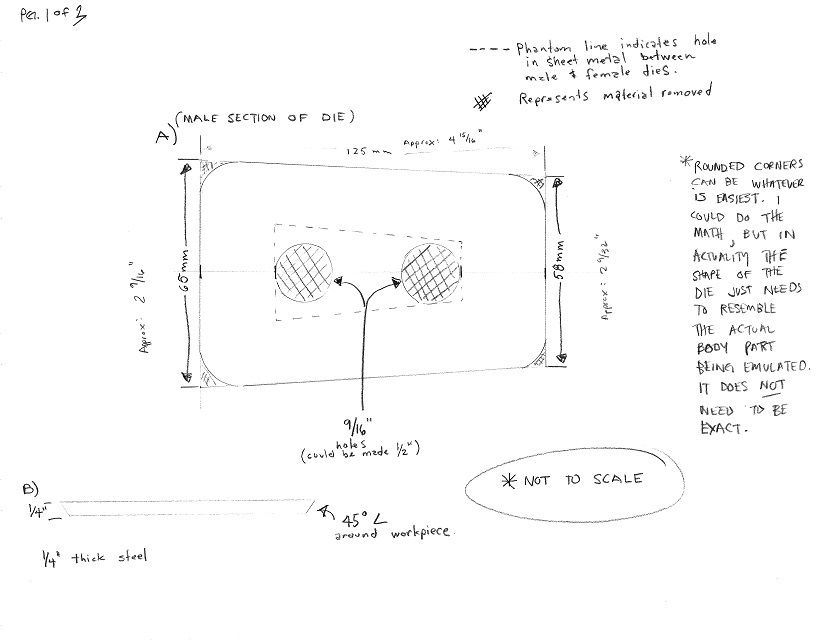
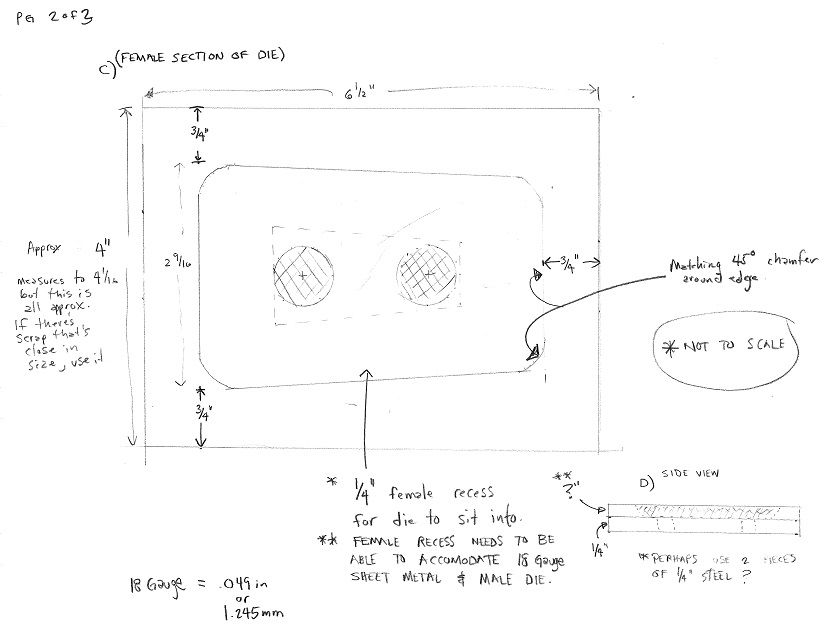
This is what we came up with:

Image

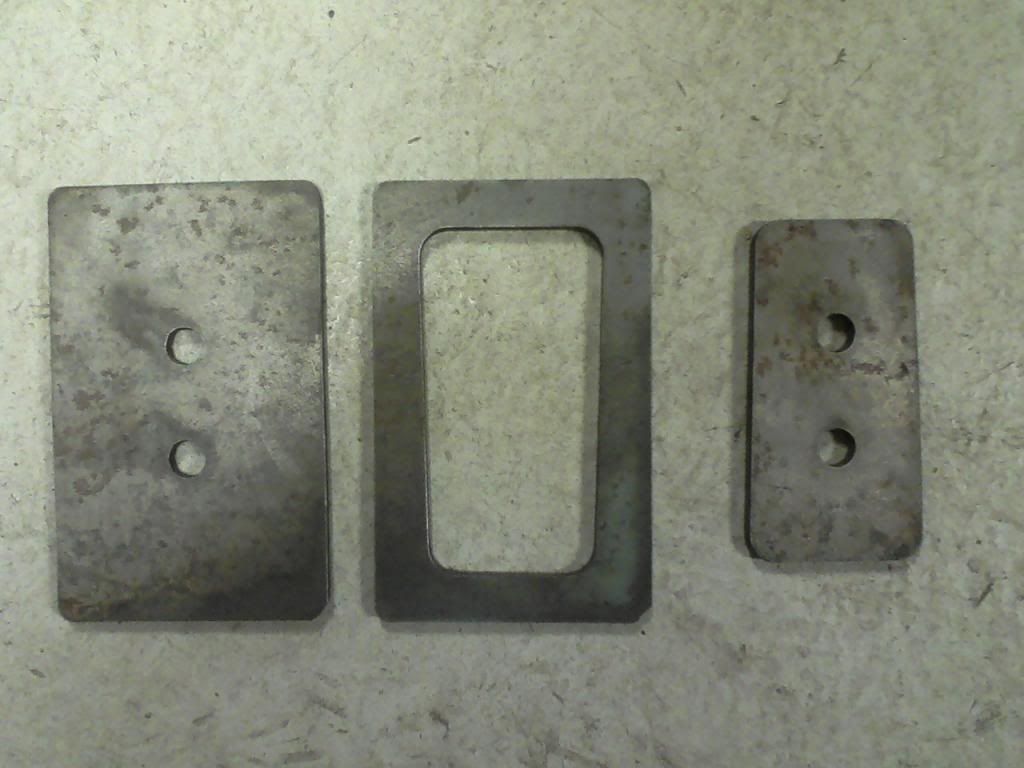
It needs a few stitch welds to be assembled. Then, I'll put a 45* chamfer around the male die and polish the working surface.

I'll run a few tests on some 18 gauge sheetmetal for practice.

And, this is where I am up to. There'll be some updates shortly.

Thanks for your time!

Brent
For more of my build, check out my Instagram account: https://www.instagram.com/kungfubowler/

User avatar
Jordi
Bow down before me
Bow down before me
Posts: 7532
Joined: Sun Nov 29, 2009 2:35 pm
Location: Darlington, Co. Durham

Re: 1988 Samurai Build: From "toad" to "off road"

Post by Jordi » Fri Jan 31, 2014 6:41 pm

UT410 wrote:Sometimes I come up with ideas that leave me sitting at my desk (or the kitchen table or behind the wheel or on the toilet) day dreaming about how I could pull it off.
Sounds like a very familiar feeling.
1988 Samurai - Truck Cab & Tray Back - 1.6 8v & HIF44 - Snorkel - Stack Exhaust - PAS, YJs & 33s - Trussed, Gusseted & Pumpkin Capped Axles - 4.3 R&Ps - 4.16 T/Box - Rear Air Locker - Full Float Back Axle & Discs - RCV Front Shafts - X-Eng Handbrake - Custom Fuel Tank

Anton
I spend far too much time on here
Posts: 3859
Joined: Tue Jan 12, 2010 12:12 pm
Location: London

Re: 1988 Samurai Build: From "toad" to "off road"

Post by Anton » Mon Feb 03, 2014 11:04 pm

UT410 wrote:Sometimes I come up with ideas that leave me sitting at my desk (or the kitchen table or behind the wheel or on the toilet) day dreaming about how I could pull it off.
You've just described my life.

Loving this build thread! That engine bay is lush! Loving it!

One thing - why are you going ARB rear and spartan front? I'd have thought it would be good to go ARB front, spartan rear (selectable up front should help steering, right?)
1985 SJ413VX (SJ50V) with SPOA, rear disc brakes, 31x10.5R15 Kaiman Malatesta tyres, an MOT and a lot left to do!

My: Build thread To-do list Pay and Play map

UT410
Got muddy boots
Got muddy boots
Posts: 25
Joined: Tue Jan 28, 2014 9:51 pm
Location: Salt Lake City, Utah USA
Contact:

Re: 1988 Samurai Build: From "toad" to "off road"

Post by UT410 » Tue Feb 04, 2014 4:07 pm

Anton wrote:
One thing - why are you going ARB rear and spartan front? I'd have thought it would be good to go ARB front, spartan rear (selectable up front should help steering, right?)

I've used a Lockrite in the front of a previous rig that didn't have power steering and it wasn't as bad as I thought it'd be, at all. That was part of my decision. The larger influence was the on-road driveability and tire wear of a locked rear. The selectable rear will allow me to drive on road without any of the characteristics of having a locker. I do drive in the snow on the pavement (tarmac) and it will get daily driver duties every so often.

It drives so well, now, I'd like to retain that feeling.

Plus, after talking to a bunch of folks, locally. They say that grip on the red rocks is something that favors running a non-selectable locker up front.

With this build, I'm going as far as I can with upgrades and mods, so the power steering (which is something I've never had on a Samurai) is going to be a luxury. Hopefully it's one that helps me from regretting not putting an ARB in the front.
For more of my build, check out my Instagram account: https://www.instagram.com/kungfubowler/

UT410
Got muddy boots
Got muddy boots
Posts: 25
Joined: Tue Jan 28, 2014 9:51 pm
Location: Salt Lake City, Utah USA
Contact:

Re: 1988 Samurai Build in Utah, USA

Post by UT410 » Tue Feb 25, 2014 10:40 pm

I took on the task of removing the old body decals. It was a pretty slow project. I overheated one spot on the passenger's side and lifted some paint. Luckily, this is where the emblem goes. So, after it's detailed and the paint looks decent again. I'll replace the Suzuki badges and it'll hide the blemish I created.

Image

Here's a shot from this morning.

Image

I removed the rocker trim and my spot weld bit bored through the rocker on nearly every spot weld. As frustrating as that was, I planned on having some liner sprayed on the rockers before I put my sliders on. So, all the holes will be masked over with either urethane or some aluminum tape and the rockers will be sprayed. If it were to be painted, I would've welded the holes up but this will work just as well.

Now that the Samurai is out of the shop space, I'll clean and reorganize so I can get to pulling the bumpers and suspension off without stumbling over things.

We have annual inspections and it's due, so I'll get it inspected before I go any further on the build. Lots of parts are waiting...
For more of my build, check out my Instagram account: https://www.instagram.com/kungfubowler/

trotter
Winching along now
Winching along now
Posts: 617
Joined: Tue Apr 15, 2008 5:59 pm
Location: behind you

Re: 1988 Samurai Build in Utah, USA

Post by trotter » Thu Feb 27, 2014 5:46 pm

nice to see a build that has had a lot of thought gone into it 1st. its looking good dude! keep up the good work
if in doubt, FLAT OUT!

mans tool kit > duct tape, wd40 and a bfh is all you ever need

UT410
Got muddy boots
Got muddy boots
Posts: 25
Joined: Tue Jan 28, 2014 9:51 pm
Location: Salt Lake City, Utah USA
Contact:

Re: 1988 Samurai Build in Utah, USA

Post by UT410 » Tue Mar 11, 2014 7:46 pm

I'm inching closer to the part where I take her off the road to do the build. I just got it back from the detailer. They removed years of neglect from the paint.

Image

Before (above) and after (below).


Image
Last edited by UT410 on Fri Jan 22, 2016 10:07 pm, edited 1 time in total.
For more of my build, check out my Instagram account: https://www.instagram.com/kungfubowler/

Anton
I spend far too much time on here
Posts: 3859
Joined: Tue Jan 12, 2010 12:12 pm
Location: London

Re: 1988 Samurai Build in Utah, USA

Post by Anton » Tue Mar 11, 2014 11:09 pm

Shiiiiiiiney!
1985 SJ413VX (SJ50V) with SPOA, rear disc brakes, 31x10.5R15 Kaiman Malatesta tyres, an MOT and a lot left to do!

My: Build thread To-do list Pay and Play map

UT410
Got muddy boots
Got muddy boots
Posts: 25
Joined: Tue Jan 28, 2014 9:51 pm
Location: Salt Lake City, Utah USA
Contact:

Re: 1988 Samurai Build in Utah, USA

Post by UT410 » Thu Jun 19, 2014 8:25 pm

Here's a modest update.

I've been preoccupied with home projects and a newborn. I do sneak off after everyone is asleep and got some things accomplished, however, it's been slow going.

Image

Image

I got my rear bumper mounted.

Image

Like I said, I work after everyone is in bed, so I get to turn the kitchen table into a work bench for wiring the bumper's lights.

Image

Then, on Father's Day, I got a treat - time to work on the Zuk. I put my rock sliders on.

Image


A colleague at my work upgraded her wheels on her 2012 Tacoma (Hilux) and passed the wheels onto me. I tried paying for them (I have a hard time accepting stuff for free) but she and her husband wouldn't accept it. I may use these wheels and tires for day-to-day driving duties to save the life of my other set for wheeling.

That's about it, for the moment. On Saturday a friend is coming over to help remove an old (1926 Ford) touring car out of my driveway to put into storage. As well, coming out of the garage is a bunch of space-taking items. Once the garage has more space to utilize, the suspension, axles, tcase, and steering box are getting pulled and my swap will begin.
Last edited by UT410 on Thu Jun 19, 2014 11:53 pm, edited 1 time in total.
For more of my build, check out my Instagram account: https://www.instagram.com/kungfubowler/

Post Reply